Welcome back, aspiring cyberwarriors!
As you know, there are plenty of automation tools out there, but most of them are closed-source, cloud-only services that charge you per operation and keep your data on their servers. For those of us who value privacy and transparency, these solutions simply won’t do. That’s where n8n comes into the picture – a free, private workflow automation platform that you can self-host on your own infrastructure while maintaining complete control over your data.
In this article, we explore n8n, set it up on a Raspberry Pi, and create a workflow for monitoring security news and sending it to Matrix. Let’s get rolling!
What is n8n?
n8n is a workflow automation platform that combines AI capabilities with business process automation, giving technical teams the flexibility of code with the speed of no-code. The platform uses a visual node-based interface where each node represents a specific action, for example, reading an RSS feed, sending a message, querying a database, or calling an API. When you connect these nodes, you create a workflow that executes automatically based on triggers you define.
With over 400 integrations, native AI capabilities, and a fair-code license, n8n lets you build powerful automation while maintaining full control over your data and deployments.
The Scenario: RSS Feed Monitoring with Matrix Notifications
For this tutorial, we’re going to build a practical workflow that many security professionals and tech enthusiasts need: automatically monitoring RSS feeds from security news sites and threat intelligence sources, then sending new articles directly to a Matrix chat room. Matrix is an open-source, decentralized communication protocol—essentially a privacy-focused alternative to Slack or Discord that you can self-host.
Step #1: Installing n8n on Raspberry Pi
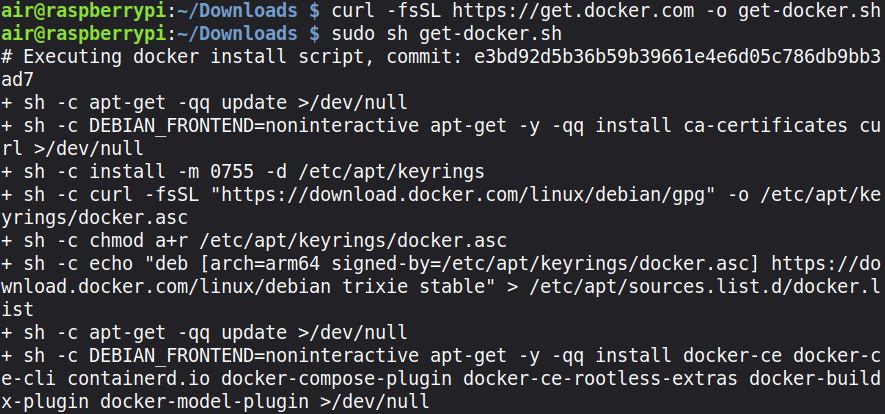
Let’s get started by setting up n8n on your Raspberry Pi. First, we need to install Docker, which is the easiest way to run n8n on a Raspberry Pi. SSH into your Pi and run these commands:
pi> curl -fsSL https://get.docker.com -o get-docker.sh
pi> sudo sh get-docker.sh
pi> sudo usermod -aG docker pi
Log out and back in for the group changes to take effect. Now we can run n8n with Docker in a dedicated directory:
pi> sudo mkdir -p /opt/n8n/data
pi> sudo chown -R 1000:1000 /opt/n8n/data
pi> sudo docker run -d –restart unless-stopped –name n8n \
-p 5678:5678 \
-v ~/.n8n:/home/node/.n8n \
-e N8N_SECURE_COOKIE=false \
n8nio/n8n
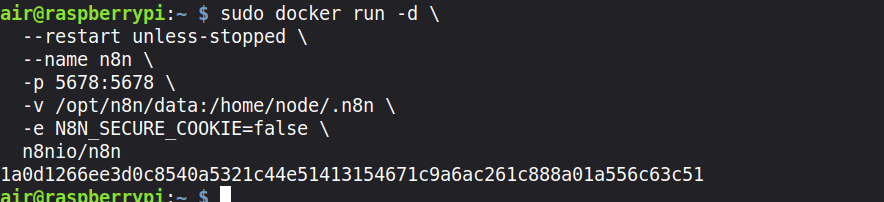
This command runs n8n as a background service that automatically restarts if it crashes or when your Pi reboots. It maps port 5678 so you can access the n8n interface, and it creates a persistent volume at /opt/n8n/data to store your workflows and credentials so they survive container restarts. Also, the service doesn’t require an HTTPS connection; HTTP is enough.
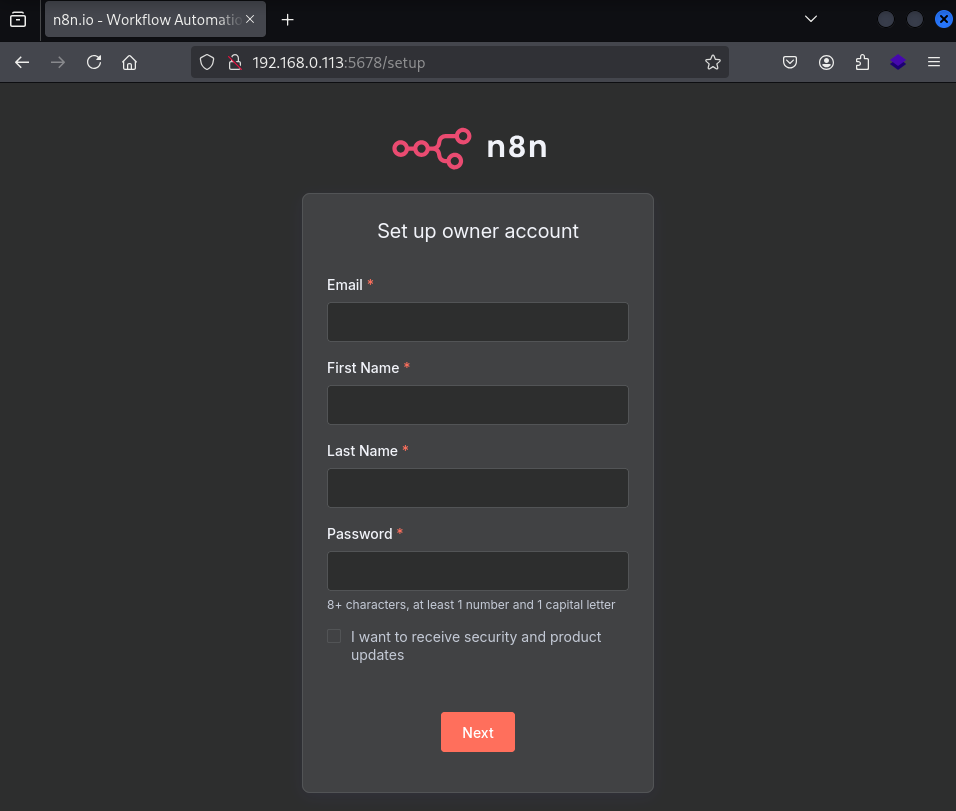
Give it a minute to download and start, then open your web browser and navigate to http://your-raspberry-pi-ip:5678. You should see the n8n welcome screen asking you to create your first account.
Step #2: Understanding the n8n Interface
Once you’re logged in and have created your first workflow, you’ll see the n8n canvas—a blank workspace where you’ll build your workflows. The interface is intuitive, but let me walk you through the key elements.

On the right side, you’ll see a list of available nodes organized by category (Tab key). These are the building blocks of your workflows. There are trigger nodes that start your workflow (like RSS Feed Trigger, Webhook, or Schedule), action nodes that perform specific tasks (like HTTP Request or Function), and logic nodes that control flow (like IF conditions and Switch statements).
The main canvas in the center is where you’ll drag and drop nodes and connect them. Each connection represents data flowing from one node to the next. When a workflow executes, data passes through each node in sequence, getting transformed and processed along the way.
Step #3: Creating Your First Workflow – RSS to Matrix
Now let’s build our RSS monitoring workflow. Click the “Add workflow” button to create a new workflow. Give it a meaningful name like “Security RSS to Matrix”.
We’ll start by adding our trigger node. Click the plus icon on the canvas and search for “RSS Feed Trigger”. Select it and you’ll see the node configuration panel open on the right side.

In the RSS Feed Trigger node configuration, you need to specify the RSS feed URL you want to monitor. For this example, let’s use the Hackers-Arise feed.

The RSS Feed Trigger has several important settings. The Poll Times setting determines how often n8n checks the feed for new items. You can set it to check every hour, every day, or on a custom schedule. For a security news feed, checking every hour makes sense, so you get timely notifications without overwhelming your Matrix room.
Click “Execute Node” to test it. You should see the latest articles from the feed appear in the output panel. Each article contains data like title, link, publication date, and sometimes the author. This data will flow to the next nodes in your workflow.

Step #4: Configuring Matrix Integration
Now we need to add the Matrix node to send these articles to your Matrix room. Click the plus icon to add a new node and search for “Matrix”. Select the Matrix node and “Create a message” as the action.

Before we can use the Matrix node, we need to set up credentials. Click on “Credential to connect with” and select “Create New”. You’ll need to provide your Matrix homeserver URL, your Matrix username, and password or access token.
Now comes the interesting part—composing the message. n8n uses expressions to pull data from previous nodes. In the message field, you can reference data from the RSS Feed Trigger using expressions like {{ $json.title }} and {{ $json.link }}.
Here’s a good message template that formats the RSS articles nicely:
🔔 New Article: {{ $json.title }}

{{ $json.description }}

🔗 Read more: {{ $json.link }}
Step #5: Testing and Activating Your Workflow
Click the “Execute Workflow” button at the top. You should see the workflow execute, data flow through the nodes, and if everything is configured correctly, a message will appear in your Matrix room with the latest RSS article.

Once you’ve confirmed the workflow works correctly, activate it by clicking the toggle switch at the top of the workflow editor.
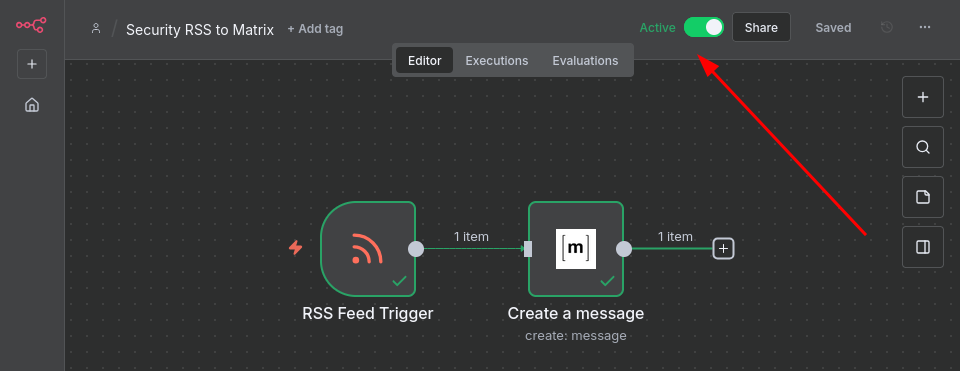
The workflow is now running automatically! The RSS Feed Trigger will check for new articles according to the schedule you configured, and each new article will be sent to your Matrix room.
Summary
The workflow we built today, monitoring RSS feeds and sending security news to Matrix, demonstrates n8n’s practical value. Whether you’re aggregating threat intelligence, monitoring your infrastructure, managing your home lab, or just staying on top of technology news, n8n can eliminate the tedious manual work that consumes so much of our time.
Source: HackersArise
Source Link: https://hackers-arise.com/automating-your-digital-life-with-n8n/